Before proceeding further with Arduino Multitasking tutorial, I strongly recommend you to refer to ARDUINO INTERRUPTS TUTORIAL and ARDUINO MILLIS TUTORIAL.
A Brief Note on Multitasking
In computing terminology, multitasking is a concept of executing multiple tasks or processes by a computer over a period of time. The concept of Interrupts come into picture in the scenario of multitasking. Interrupt is a process of letting the computer know that a different task is in need for its service. Consider a situation where there are no interrupts in a computing system. In this case, if a new task requires the service of the computer, it must wait until the present task is fully executed by the computer. This is not feasible as the new task might be critical and requires urgent attention from the computer. Interrupts play an important role here. When a task interrupts the computer, it puts the present task on hold, executes the new task and returns back to the original task.
Multitasking in Arduino
Arduino is a simple microcontroller based platform without the concept of operating system. This means that only one program can run in Arduino at a time. Even though there is no operating system, we can still achieve the concept of multitasking i.e. handling multiple tasks in Arduino. In order to handle multiple tasks in Arduino, you need to make use of two concepts. They are Interrupts and millis.
Get rid of delay ();
In my previous tutorial, I have spoken about millis function in Arduino. I have also spoken about why using delay function is bad and doesn’t help us in multitasking. When you use the delay (); function in Arduino, you are actually putting the processor in a busy state for the time period mentioned in the delay. During this time, the Arduino processor cannot do any other tasks like read from a button, for example. Here comes millis to the rescue. Millis is a timekeeper function that starts when the Arduino is powered on (or reset) and the program in Arduino starts running. Whenever we call the millis function in our program, it returns the time in milliseconds from the moment the program started running. I have already spoken about millis and how to use millis in my previous tutorial. Please refer to that for more information.
Interrupts in Arduino
Arduino, or the microcontroller on the Arduino UNO board to be specific, supports Interrupts. Arduino UNO board has support for two external interrupts on Digital IO pins 2 and 3. Using these external interrupt pins, you can trigger external interrupts and advice Arduino to perform a special task. In an earlier tutorial called Arduino Interrupts Tutorial, I have spoken about interrupts in Arduino, how to enable them, what is an interrupt service routine (ISR), what care must be taken while writing an ISR function and an example program.
Blinking Two LEDs at different Rates without using delay
In the Arduino Millis Tutorial, I have shown you a simple program which can be used to blink and LED but without using the delay function. This is possible with the millis function. If you are using delay function for blinking two LEDs, you cannot achieve different ON and OFF times for the LEDs and make then blink simultaneously at different rates. But you can implement this with the help of millis in Arduino. Before seeing an example on Arduino Multitasking, let me show you an example of how to achieve the above mentioned functionality.
Arduino Multitasking Example
Let me now show a simple Arduino Multitasking code. For this, let us take the above example as a reference i.e. I will use the above code and extend it a little bit to achieve multitasking in Arduino. In the above example, I am blinking two LEDs at different rates simultaneously. Continuing the same task, I will add a new task where an LED connected to a different pin must be toggled every time I press a button. This should happen instantaneously as soon as I press the button with any delay.
Circuit Diagram for Arduino Multitasking Example
Components Required
Arduino UNOLEDs x 31KΩ Resistors x 3Push ButtonConnecting WiresMini Breadboard5V Power Supply
Circuit Design
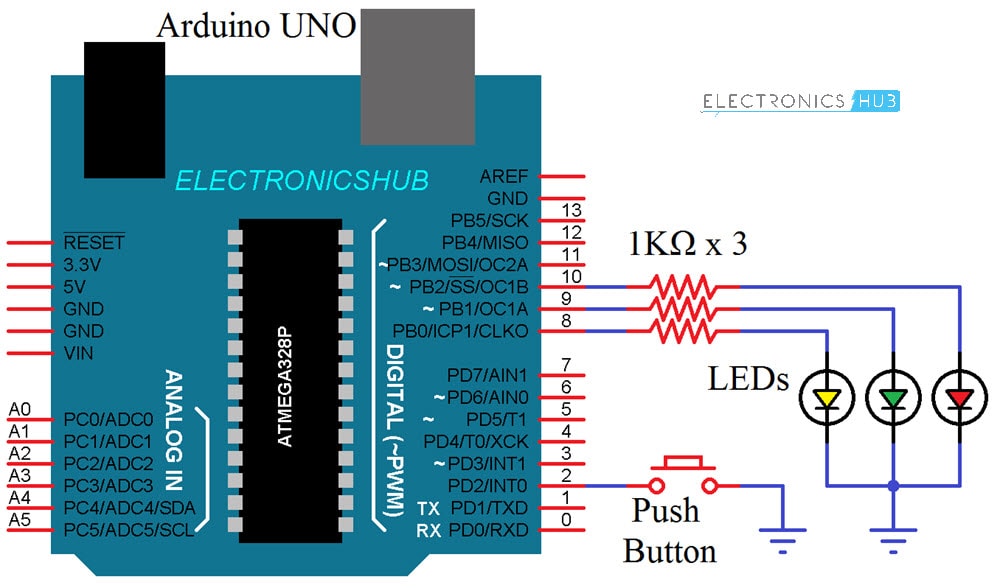
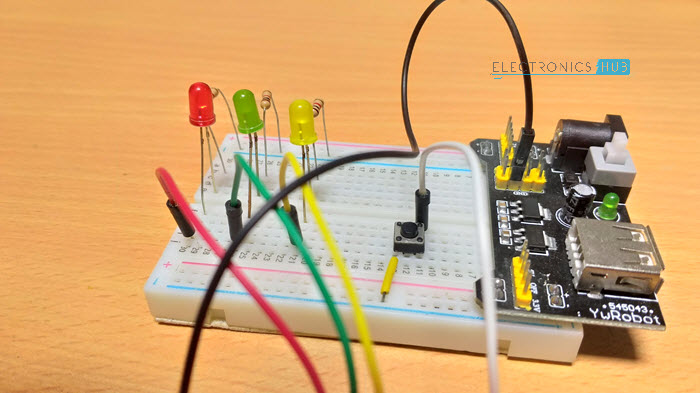
This is a simple demonstration of multitasking in Arduino and doesn’t involve a complex circuit. Three LEDs (preferably of three different colors) are connected to Pins 8, 9 and 10 of Arduino through respective current limiting resistors. A push button is connected to Pin 2 of Arduino (important to connect it to this pin).
Code
Working
When the Arduino starts running the program (after uploading it), it will just blink the LEDs connected to Pins 8 and 9 as per the mentioned ON and OFF Times. As the button is connected to the external interrupt pin Digital IO Pin 2, whenever it is pressed, an interrupt is generated and the status of the buttonflag is updated. Based on this flag, the Arduino will then toggle the LED connected to Pin 10.
Conclusion
This is a simple example of implementing multitasking in Arduino. You can implement complex projects involving several components like motors, LEDs, servos, etc. and use interrupts to achieve multitasking. I believe that if the use of “millis” was simplified as with “delay” – more people would use it. Comment * Name * Email * Website
Δ


![]()